Wednesday, May 30, 2012

Turkish Kofte

Turkish Kofte (meatballs) with Persian Cucumbers, Tomatoes and Cucumber Yogurt Sauce

 Kofte is a traditional Middle Eastern meatball.  I have made a Persian version before but after being in Istanbul for three weeks I decided to search for Turkish Kofte recipe.  Food in Istanbul is simple, fresh and delicious.  On my other blog www.abroadivf.blogspot.com, I have examples of the things that I cooked as well as local street food.  This meal is often served with some kind of potato,(Turks love french fries) but I served it with fresh sliced Persian cucumbers, tomatoes, and homemade cucumber sauce.  

  Tomatoes and cucumbers are a staple in Turkey.  I love them so much that I have even adopted a typical Turkish breakfast with tomatoes, cucumbers, a little cheese, yogurt, fruit and sometimes honey.  I lost weight while I was there so I think they are on to something.  

  Cucumber or Tzatziki sauce is something I have been making for awhile.  You can check out my Tzatziki Sauce recipe here or below I will explain my super quick and easy version that I have now adopted.  

Turkish Kofte

I made a double batch so we would have leftovers but you can easily cut this recipe in half.

1 lb ground beef
1 lb ground lamb - you can use all of one or the other if you want
1 tsp salt
1 tsp pepper
1 tsp cumin
3 eggs
2 C. fresh breadcrumbs -I added a little more than 2 C - if they feel too wet add a little more too dry add less
3 cloves of fresh garlic - grated
1 large onion grated
Olive oil for frying 

Spray large tray with non stick cooking spray and pre-heat oven to 350 degrees F

For the breadcrumbs I took some leftover Challah bread and pulsed it in my food processor.  Use what ever you have.  

1.  In a large bowl add all the ingredients except the olive oil in a large bowl.  Mix well with hands.   


2.  Take golf ball size pieces of the mixture and shape into tear drops, placing each one on the tray.  


3.  Heat olive oil in a skillet on medium high.  I prefer a cast iron skillet. 


  2 options for cooking...
   
     A.  Sear each side of the meatball til golden brown, 1 -2 minutes each side, and then       
           place them in a baking dish and finish in the oven for 25 -30 minutes.  

    B.  Sear each side in skillet and then turn down the heat to finish them all the way thru.  

I have tried both and preferred the juiciness of the skillet method


Quick and Easy Cucumber Yogurt Sauce

1 C plain yogurt - regular or Greek - I use FAGE
Juice of 1/2 of a lemon
salt and pepper to taste
1 -2 tsp olive oil
1 Persian cucumber grated (small baby cukes) 1/2 of a regular or English with seeds removed is fine
Sprinkle of garlic powder or 1 clove grated  - I get lazy and go for the powder

1. Mix all ingredients.  You're done!  See wasn't that easy!


I make this all the time and serve it with lamb chops, chicken kebabs, or the Kofte.   My family loves it and it is so good for you.  I have even used it on turkey burgers and lettuce wraps.

I hope that you enjoy my take on this traditional Turkish dish.

Enjoy...
 

Thursday, May 24, 2012

Double Chocolate Zucchini Cake 

Not the greatest photo but don't let that deter you from making this recipe!
  OK, it has been forever since I have posted. Life got in the way.  I stopped food blogging about a year ago when we began fertility treatments, which took a toll on me emotionally.  It has been a long year and if you would like to know more about it, please check out my other blog,  www.abroadIVF.blogspot.com, where we tell you all about our trip to Istanbul.

  Now back to the food.  This recipe I adapted slightly from Two Peas and Their Pod, which I love.  It originally started out as a brownie recipe but mine turned out more like a fudgy cake.  This recipe is chocolatey, moist, and super delicious.  The best part is that there are vegetables in it, which I absolutely love!  My kids love this recipe and so does my husband.  Even my super picky niece gobbled this down last year when I took it camping.  I promise you don't even taste the zucchini or even know it is there.  


Double Chocolate Zucchini Cake

1 1/2 C granulated sugar
2 C all purpose flour
1/2 C canola oil
1/4 C unsweetened cocoa powder
2 cups pureed zucchini - the original recipe calls for shredded which I suspect makes them like brownies?
2 tsp. vanilla extract
1 1/2 tsp. baking soda
1 to1 1/2 C chocolate chips - the first time I made this I used a mixture of semi sweet and white chocolate


1.  Preheat oven to 350 degree F.  Spray a 9 x 11 baking dish (mine was glass).

2.  In a stand mixer fitted with the paddle attachment (you can also do this by hand in a large bowl) add sugar, oil, and flour.  Combine until it resembles wet sand.  While mixing on low add the zucchini, cocoa, vanilla, salt and baking soda.  I know what you are thinking...what about separating the wet and dry ingredients?  Well, for whatever reason it works out fine.  I did separate them last year into wet and dry and that works out too. 

3.  Pour into the baking dish and bake for approximately 25-30 minutes.  Keep an eye at about 20 minutes and check with a toothpick or fork to see if it comes out clean in the middle of the cake.  

 Let cool completely before cutting, or scooping it out warm and serving with some homemade vanilla ice cream would also be delicious!

Enjoy...


Wednesday, July 20, 2011

Strawberry Freezer Jam


  Summer is finally here and what is better than fresh berries?  I remember when I was a little girl and my grandmother would make freezer jam from strawberries we would pick while visiting her in Michigan.  It was the sweetest most wonderful thing ever.  That incredible taste stays with you for a lifetime.  I'm guessing that is because of the great memories surrounding it.  A few years ago after moving back north my family and I started picking fresh strawberries every June at the local farms.  Each year I get more and more.  This year we picked 6 gallons of fresh berries and the first thing that I do is make freezer jam just like my grandmother did all those years ago.


  You don't cook the fruit for this recipe so the jam taste more like fresh fruit.  Don't be scared this is truly a fast and easy way to make jam.  We picked strawberries in June and I have thoroughly neglected my blog lately,  In fact when I started this post last month we have since picked blueberries and giant blackberries in the mountains of NC.  I decided to try freezer jam with these other berries and even some SC peaches and they all turned out great.

  I don't just put it on toast and bagels, I mix it in with homemade ice cream, smoothies, and even make mousse with it. But don't just think sweets and desserts.  How about using them as a glaze for a pork tenderloin or chicken.  Maybe a ginger peach glaze...yum! 

  I like to use the Sure-gel brand of pectin but Ball also makes one. I tried Ball pectin one year and to be honest I like the Sure-gel better.  You use a lot less sugar and more berries for the Ball but I guess the taste just wasn't what I remember from my childhood.  Although I do like the idea of less sugar and more fruit so I think next time I will try the no sugar needed pectin from Sure-gel.  

This is simple just follow the directions for your fruit of choice on the package.  The following recipe is for use with Sure-Gel.

Strawberry Freezer Jam
Ingredients:

2. C. crushed strawberries -  I like to use fresh picked berries because the flavor is more intense.
4 C. sugar
3/4 C. water
1 box of Sure-Gel

Directions:

1.  Wash and dry your lids and jars.

2.  Mash berries with a potato masher or in a food processor.  Do not over puree, you want bits of fruit in the jam.

3. In a large mixing bowl measure the exact amount of fruit.

4.  Measure the exact amount of sugar and pour into the berries.  Stir well.  

5.  In a small saucepan place 3/4 C. water and the contents of the Sure-Gel package.

6.  It may start out lumpy but that is OK.  Stirring constantly bring to a boil on high heat.  Let it boil for 1 minute, stirring constantly.  

7.  Pour the Sure-Gel into the fruit/sugar mixture and stir constantly until completely dissolved, about 3 minutes.  

8.  Pour into containers, leaving a 1/2 inch space to allow for expansion, cover.

9.  Let stand at room temperature for 24 hours before placing in the freezer.  The jam will last in the refrigerator for about 3 weeks and will last in the freezer for up to 1 year.


Enjoy!

Monday, July 11, 2011

Blueberry White Chocolate Scones

Blueberry White Chocolate Scones

   I probably should have waited to make these after we picked gallons of fresh blueberries this summer in the mountains of North Carolina, but I couldn't wait.  When you taste them you will understand.  Warning, these are awesome!  I adapted this recipe from pickycook.com where I have found a lot of great recipes to try.  I have since also made these scones with strawberries since we picked 6 gallons a few weeks ago and they were delicious.  I used fat free Greek yogurt instead of the sour cream and it worked fine.   
  These are wonderful warm and soft right out of the oven, plain or with a little butter.  They were also delicious warm as a shortcake with homemade ice cream and some of my strawberry freezer jam. 
  These are a little tedious the first time you make them, but they are well worth it, and they were definitely quicker the next time.  I like to cut mine into small triangles since they are not low fat.

Ok, so here we go...
1. First adjust your oven rack to the middle and pre-heat to 425 degrees F.  You didn't want a picture of that did you? 

2. Pull the butter out of the freezer and grate it until the stick is gone.  Place it back in the freezer. 
Frozen Grated Unsalted Butter
Ok, stop!  Why did I not know about this sooner?  This is the greatest trick ever!  Why,  you ask?  Well, you want the butter to stay cold so you get nice and flaky biscuits. (That part I knew!)  Freezing it allows you more time so your hot little hands don't melt it as fast.  Grating it allows you to work with it less when you mix it with your flour mixture and it remains more uniform.  You also don't have to try cutting it in with a pastry cutter or 2 knives, which is a pain in the you know what!   Ha!  I've got you now biscuits and pie crusts. 

3. Next, in a medium bowl whisk together the milk and light sour cream and refrigerate.

Have I ever told you about my love of sour cream when I bake?  Well it has been a long love affair and we don't have that kind of time.  Let's just say it all started with Texas Sheet Cake and it has never stopped.  Go ahead, tell my husband, he approves! 


4. Ok, now mix all the dry stuff plus the lemon zest.   A little of this a little of that.   For goodness sake people, don't trust me!  Read the recipe at the bottom!


5. Now, pull that super fantastic grated butter out of the freezer and gently toss it together with the flour mixture.
Yes, you can use your hands, but do NOT get too frisky with the butter you don't want it to melt!  You can go a little faster.  Geez we don't have all day!


6. Ok, now gently fold in the milk mixture with a rubber spatula until just combined. 

This is not a Jane Fonda workout (or for you younger people P90X.)  Don't overwork the dough!  Do you want tough chewy scones or light and fluffy ones?
 
Seriously, I swear I am not that old, I just couldn't think of anyone else besides Jane Fonda! 

7.  Dust hands with flour and turn dough out onto floured work surface.  Knead dough a few times until it just holds together in a ragged ball. You may need to add a little flour here or there as needed to prevent untimely stickiness.


8.  Shape into a rectangle with your hands (still being quick people - your hands are hot!)
 
9. Roll out into into a 12 " rectangle. 


10.  Fold dough in thirds like a letter, using a bench scraper or metal spatula to help lift.  I like to dip mine in a little flour to help it out. 


11.  Fold in thirds again til you get approximately 4 " square of dough.  Place that bad boy on a floured plate and put it in the freezer to chill out again for 5 minutes.


12.  Roll dough into a 12 " rectangle again. 
13.  Strategically place the blueberries and white chocolate chips Let's get this right people.  No, seriously just throw them on and gently press them down into the dough a little.
I only place blueberries on 3/4 of this dough because I tested the other 1/4 with homemade strawberry jam.
 14.  Roll dough into a log starting at one end and tucking in any berries or chocolate that wants to escape along the way.  

15.  Roll log gently into a thick rectangle about 6-7" x 12".
 Totally forgot the next picture so this is of this same recipe but with brown sugar and cinnamon scones. Sorry...

16.  Cut in half long ways (for mini scones I cut into thirds)

17.  Cut into triangles


18.  Brush with heavy cream or melted butter and sprinkle with sugar (Sparkling sugar would be pretty but I didn't have any).

Brush scones with heavy cream or melted butter and sprinkle with sugar before baking
Last and final step....BAKE them at 425 degrees F for 18 -25 minutes
Crap... I lied...I am always doing that...last step...EAT! 
There.  I'm done.


Ingredients
1 stick frozen unsalted butter
1 1/2 C. fresh or frozen blueberries (Do Not thaw frozen berries) - I used fresh
1/2 C. whole milk
1/2 C. light sour cream
2 C. all purpose flour, plus more for dusting work surface
1/2 C. Sugar
2 tsp. baking powder
1/4 tsp. baking soda
1/2 tsp. table salt
Zest of 1 lemon
1/3 C. white chocolate chips
Heavy cream for brushing
Regular or course sugar to sprinkle on top

These look complicated but after you make them once I promise they are a breeze to make.  The recipe is actually very simple and has endless possibilities.  

Blueberry White Chocolate Scones


Enjoy!

Saturday, June 4, 2011

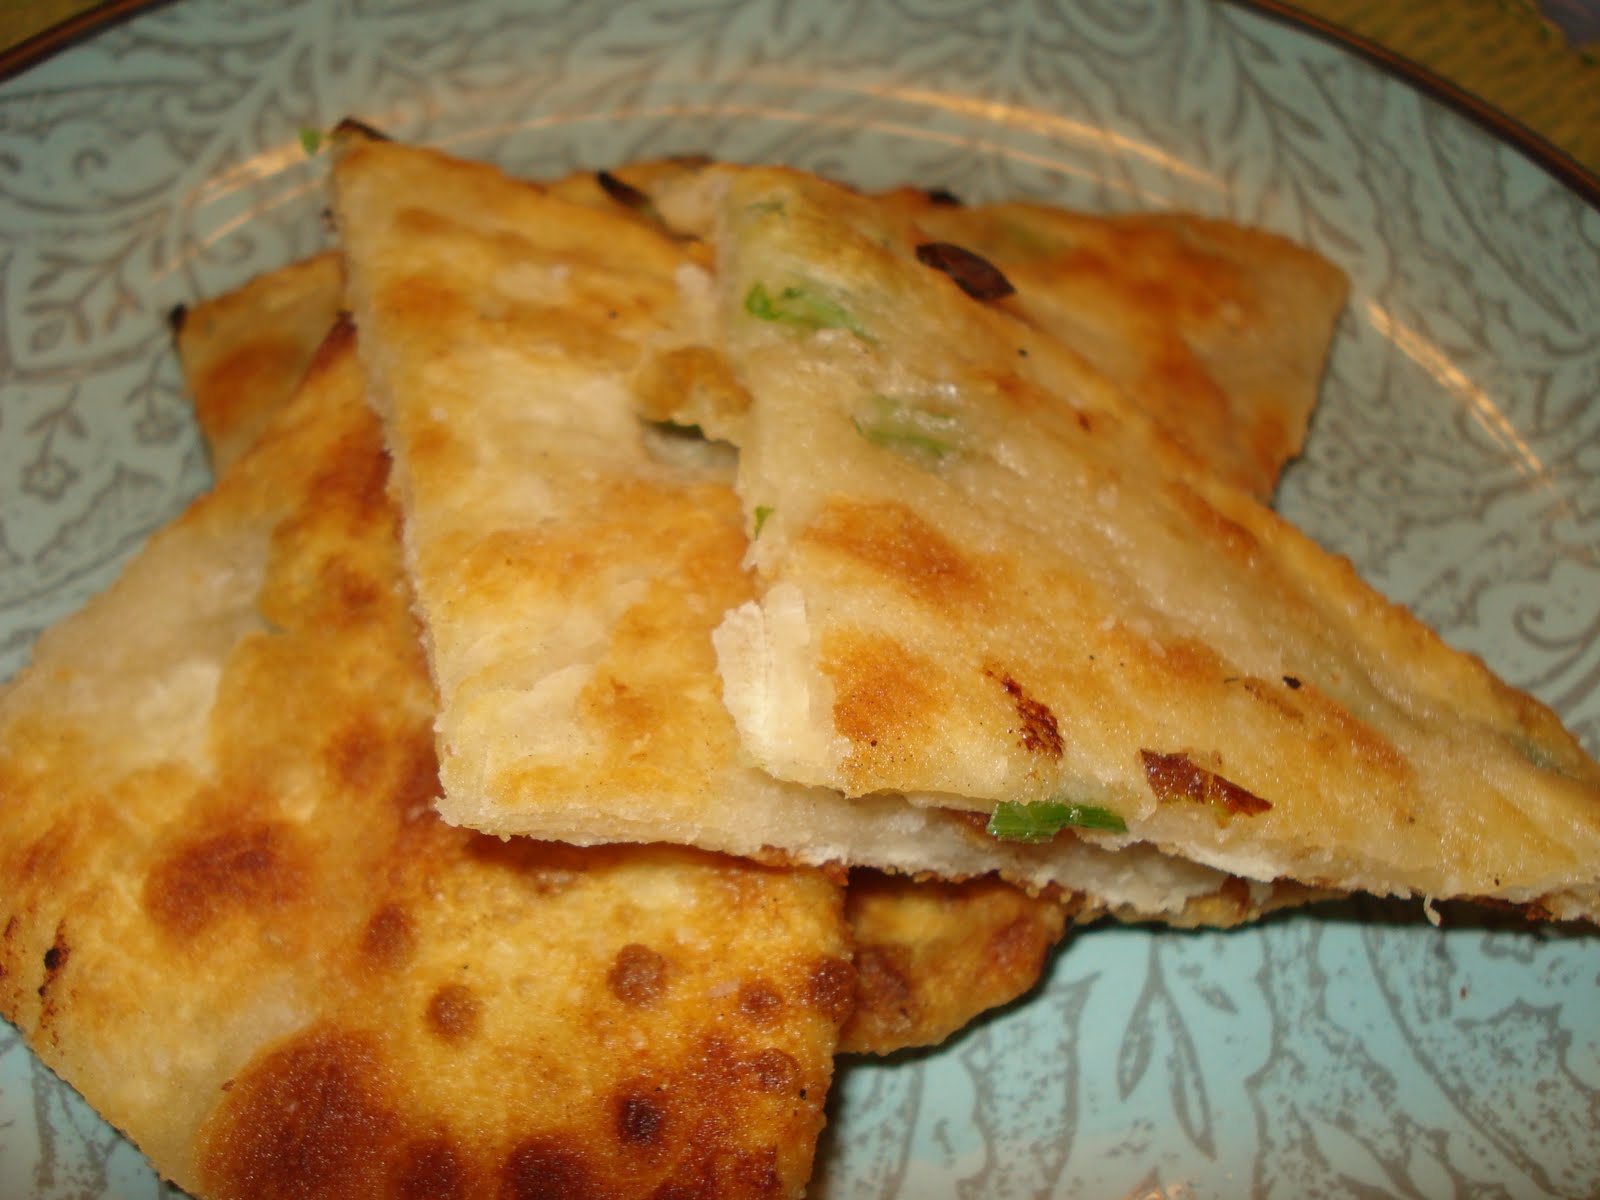
Spring Onion Skillet Flatbread

Spring Onion Skillet Flatbread
 
  This bread is so easy and quick.  I serve it with Asian food but I think that it would be good with just about anything.  I keep wanting to save some to make some panini sandwiches but it never lasts past dinner.  I think that it would be wonderful with some provolone, fresh heirloom tomatoes from my garden, a little olive oil, balsamic vinegar and fresh basil.  I guess once my tomatoes show up I will have to start doubling my recipe and experiment a little.  
  This recipe calls for green onions but you could substitute for fresh thyme and rosemary, chives, or any fresh herbs. 

Ingredients:

1 1/2 C. all-purpose flour
3/4 C. water
1 Tbsp. canola oil, plus 3 Tbsp. for frying
1 Tbsp. kosher salt or sea salt
1/3 C. thinly sliced green onion

Directions:

  • Turn oven to warm setting or about 200 degrees F
  • Place an oven proof plate in the oven with a couple paper towels on it. 
  • In a medium bowl, combine flour and water. Stir well to mix and turn into a soft dough.
  • Lightly flour a work surface and your hands.  Scrape dough out onto the work surface and knead for 2 minutes until you get a smooth, soft ball of dough. (The original recipe calls for 5 minutes of kneading but I find that it makes the bread tough.)
  • Cover the ball of dough with the bowl and let rest for 5 minutes.
  • Divide the dough into 3 equal portions using a butter knife or a pastry scraper.  Covering 2 of the sections with the bowl while you work, place one portion on the floured work surface, and roll it into a circle, 6-8 " in diameter.
  • Brush 1 tsp. of oil on dough and lightly and evenly coat the surface.
  • Sprinkle with 1/3 of the green onion.
  • Roll the dough into a log.  The dough will be soft and uneven but that's ok.  
  • Twist the dough into a spiral and then fold in the ends and tuck them under.  Gently and firmly flatten it into a thick cake.  
  • Heat a well seasoned cast iron or non stick skillet with canola oil on med/high heat.  
  • In the meantime roll the dough out gently to about 7 in.  Mine never are a perfect circle more oblong.
  • Place the dough in the hot skillet and fry the bread in the skillet until golden brown on both sides.  
  • Sprinkle with a little kosher or sea salt while the bread is hot
  • Place on a warm plate in oven to keep warm
  • Repeat with other 2 sections of dough
  • I like to cut into pieces to serve
  • Serve with lettuce wraps, stir-fry or just about anything!
Spring Onion Skillet Flatbread


Enjoy!

Friday, June 3, 2011

Thai Green Curry Chicken

Green Curry Chicken with Snow Peas and Mushrooms
    
  I was first introduced to Thai food when I lived in Florida.  The Chinese restaurants where I lived were less than stellar, but there were many excellent Thai restaurants where my friends introduced me to new and wonderful flavors.  I still crave the steamed dumplings, Pad Thai, and other incredible appetizers and dishes that were placed in front of me.  I modified this recipe from a book I checked out at the library but I unfortunately can't remember the name.
   Coconut milk is found in many Thai dishes and even if you are not a coconut fan (like my husband) give it a try.  The coconut flavor is very subtle in this dish and gives it a creaminess.  Green curry paste can be found in the ethnic section of your grocery store.  This dish is simple, quick, and filling when served over white rice.  I love to add snow peas and mushrooms but sugar snap peas or broccoli would be wonderful too.  

Ingredients:

1 1/2 T. canola oil
2 tsp. Thai green curry paste
6 boneless chicken thighs sliced crosswise
1/2 tsp. fish sauce
1 C. lite coconut milk
6 Tbsp. chicken broth
1/2 - 1 long green chile, seeded and minced ( I used a Serrano pepper b/c that is what they had at the store)
1/2 lb. snow peas
1/2 lb button mushrooms sliced thinly (next time I would use more b/c there are never enough as far as I am concerned)
Steamed rice

Directions:
  • Heat canola oil in a wok or large saute pan on medium/high heat
  • Add curry paste and stir fry for 45 - 60 secs. 
  • Add chicken and stir-fry until opaque
  • Add fish sauce and a little coconut milk and de-glaze the pan
  • Add the rest of the coconut milk, chicken stock, chile and stir well
  • Reduce to approximately 2/3 C. over about 6-7 minutes
  • Add mushrooms and cook until soft for a few minutes.  Add snow peas and cook another 1-2 minutes.  
  • Serve over steamed rice.   
 Enjoy!

Tuesday, May 24, 2011

First Harvest! Heirloom French Breakfast Radishes

French Breakfast Radishes

     I love to garden and just had to share some of my first harvest of the season.  These are French Breakfast Radishes.  They are an heirloom radish that has a mild delicate flavor.  As a kid I never liked radishes.  My mom would slice them thinly and put them on really good,buttered toast with a little salt.  Maybe it is because I grew them myself or maybe my tastes have matured but I have to admit that I like them now.  I slice them and sprinkle them with a little sea or kosher salt or put them in a salad.  They have that wonderful crunch and the salt balances out that spiciness.  They are so easy to grow and are a wonderful vegetable to have your kids plant because they mature fast.  They take about a month before you can harvest. 

I would like to try roasting them with a little olive oil, garlic, and sea salt.  Anyone have any ideas or recipes to share??  Leave a comment at the bottom of the post and let me know! 

French Breakfast Radish with Kosher Salt 

Chocolate Toffee Almond Biscotti

Chocolate Toffee Almond Biscotti

  Ok, so I have not posted in about 1 month and I apologize.  With kids in baseball 3-5 days a week and trying to keep up with the normal chores after work I have hardly sat down. I wrote this recipe awhile ago and completely forgot to post it.  Thank you to a former co-worker that posted on FB and kicked my butt into high gear!
  I love biscotti and this is one of my favorite recipes.  These crispy cookies are perfect in the morning with coffee, tea, or milk.  My kids also love them as a sweet afternoon snack.  I make a batch of these around the holidays and wrap them up in a pretty cellophane bag and give them as gifts.  They are sweet, crunchy and addictive!   They would also be delicious dipped in chocolate!

   I made one large loaf for this recipe but it spread out quite a bit, so next time I will make two loaves.  Also, 18 - 20 minutes of baking time is for nice and crunchy cookies.  If you like them a little softer or know your oven cooks really hot decrease it by a few minutes. 


Ingredients:

2 C. flour

1 C. sugar

1 tsp. baking powder

1/8 tsp. salt

3 large eggs 

2 Tbsp. vanilla extract (seems like a lot but the original recipe called for 2 Tbsp. Amaretto (which I didn't have) or 1 1/2 tsp. almond extract (which I also didn't have and am not crazy about...) plus 1 tsp. vanilla.  So hence the reason I added so much vanilla.  It worked perfectly the first time so that is how I do it all the time now. 

3/4 C. sliced almonds

3/4 C. Heath Bar chocolate toffee pieces-in the baking aisle next to chocolate chips (I get ambitious during the holidays and make homemade chocolate covered toffee so that works too!)


Another hour and a half,give or take, and you will be able to dunk this baby!

Directions: 

  • Pre-heat oven to 300 degrees F
  • Very important don't skip this step or I will hunt you down...line 2 baking sheets with parchment paper, set aside.  About the hunting you down thing..don't worry the clean up of the sheet pan and ruined biscotti are punishment enough!
  • In a medium bowl whisk flour, sugar, baking powder, and salt
  • In a large bowl beat eggs and vanilla with an electric mixer
  • Mix dry ingredients with egg mixture until well combined.  The dough will be sticky but don't add more flour
  • Flour the surface of the parchment paper and lightly dust you hands with flour 
  • Roll out 1/2 of the dough and shape into 3 " wide log, repeat with other 1/2 of the dough on separate lined sheet
  • Bake 45 - 50 minutes
  • Cool 10 minutes
  • Slice on the bias into 1/2 " pieces
  • Bake cut side down another 18- 20 minutes
  • Remove trays from oven and flip pieces over, bake another 18 - 20 minutes 
  • Cool completely 


 Enjoy!

Monday, April 18, 2011

Key Lime Crackle Cookies

Key Lime Crackle Cookies
 
  Ok, so here I go again with the citrus desserts.  I love lemon and lime desserts and was inspired when I stumbled upon this recipe which was originally a lemon cookie.  I have done both and enjoy each flavor.  The original recipe calls for only a tablespoon of fresh juice but I have found that we like a stronger lime or lemon flavor so I add more.  In fact for this batch my husband said it could be even stronger so I made a light glaze with lime juice to drizzle over the top.  More zest might give it more of a punch if you like a stronger flavor. 
   If you love the cool refreshing flavor of Key Lime then I hope you enjoy this wonderfully chewy cookie.   Be careful though, it is hard to eat just one.    

Servings = 44
Serving Size of dough = 1 heaping teaspoon
WW Pts. plus = 1 (without glaze)

Ingredients:

1/2 C. butter, softened
1 C. sugar
1/2 tsp. vanilla
1 egg
1 -2 Tbsp. fresh Key Lime juice( I used 2)
1-2 tsp. lime zest
1 1/2 C. flour
1/4 tsp. salt
1/4 tsp. baking powder
1/8 tsp. baking soda
Powdered sugar to roll dough 


Glaze (If desired)

3 -4 Tbsp. powdered sugar
skim milk, add 1 Tbsp. at a time for desired consistency
Juice of 1/2 large lime(or lemon)


Directions:

  • Pre-heat oven to 350 degrees F
  • Spray a cookie sheet(s) with non-stick spray or use parchment paper
  • Whisk flour, baking soda, baking powder, and salt.  Set aside.  
  • Cream butter and sugar and beat until light and fluffy
  • Add egg, vanilla, Key Lime juice, lime zest and beat well
  • Add flour mixture in 2-3 batches, scraping sides.  Beat until just combined.
  • Roll heaping teaspoon sized balls of dough in powdered sugar.  Just a dusting.  
  • Place dough on cookie sheets and  press down with your thumb to flatten cookie
  • Bake 9-11 minutes until they have a matte(not shiny) finish and are just barely starting to brown on the bottom. 
  • Drizzle with glaze if desired.

Enjoy!

Tuesday, April 12, 2011

Honey Teriyaki Pork Tenderloin

Marinated pork tenderloin with a honey teriyaki glaze
    
   Do you have one of those meals that you can't get enough of.  You know, the one where you keep going back for more even though you know you shouldn't.  Well I do, and this is it!
  The tenderloin is one of my favorite cuts of meat because it is tender, juicy and very lean.  It is wonderful marinated and if cooked properly will melt in your mouth.  
   First, I marinated the pork in homemade teriyaki.  Next, I brought the same marinade to a boil and reduced it to make a sweet glaze that is perfect drizzled over the meat.  I serve this with my mom's Sweet and Sour Green Beans and Garlic and Chive Mashed Potatoes.  I will post those recipes later since I forgot to take pictures this time around.
   * The teriyaki sauce is a basic recipe I use for a lot of different things from Asian noodles, stir fry, and my lettuce wraps.  I change it up and tweak it here and there depending on what I am making but this recipe is very versatile.  Sometimes I add pineapple or apple juice or for lettuce wraps I add a little ketchup, garlic chili paste and spicy mustard.  Add your own flare and let me know what you come up with.  I would love to hear suggestions!
 
 
Ingredients:
1 1/2 -2 lbs pork tenderloin, trimmed ( I had 2 lbs which is actually 2 separate pieces of meat packaged together).
1/2 -1 Tbsp. olive oil

Marinade and Sauce:
1/2 C. Soy Sauce or Tamari
1.2 C. water 
2 Tbsp. rice vinegar
3 cloves garlic, pressed
1 1/2 tsp. minced garlic
1/2 tsp. sesame oil
2 Tbsp. dark brown sugar
1 Tbsp. honey
1 tsp. crushed red pepper flakes


Directions:

  •  Pre-heat oven to 350 degrees F
  • Whisk all marinade ingredients together and pour into a gallon size zip lock bag.
  • Place pork in marinade and close bag.   Put bag in a large bowl and marinate in the refrigerator 1 hour to overnight.  I usually turn the bag a few times while marinating. 
  • Heat a large oven proof skillet on high.  Once hot, add marinated meat and sear until golden brown on all sides.  Approximately 2 minutes per side.
  • Place skillet in the pre-heated oven and roast until the meat reaches 140 degrees F.  Approximately 15-20 minutes.  
  • Meanwhile place marinade into a sauce pan and bring to a boil.   Turn down to a simmer on low.
  • Remove meat and place on a serving platter.  Let the meat rest for 10 minutes until it reaches 145 degrees F.
  • Place hot skillet that you cooked the meat in back on stove and turn to medium high.  
  • Pour the marinade into skillet and de-glaze the pan by scraping all of those yummy bits off the bottom.  Bring to a simmer and reduce to thicken for a few minutes. 
    • `If you want a thicker sauce, more like a gravy, add either arrowroot powder to the sauce and whisk or a 1:1 mixture of cold water/cornstarch.  Start with 1 Tbsp of each.
  • Slice the tenderloins into medallions and drizzle with the teriyaki sauce.
Enjoy!

Tuesday, April 5, 2011

Berry Banana Mango Smoothie

Strawberry Banana Mango Smoothie
  
    I don't like to waste, especially fruit.  We spend a lot of money on fruit and it really irks me when something goes bad and I have to throw it out.  This recipe is my solution for those browning bananas (besides banana bread or muffins), slightly wilted strawberries or over-ripe mango.  I simply freeze the fruit and use it later.  I always clean and slice the fruit and lay it in a single layer in a zipped gallon sized bag.  I then lay the bag flat on a cookie sheet and pop into the freezer.  This is so the fruit doesn't clump together as it is freezing.  Once it is frozen you can take out the cookie sheet.
   Over-ripe, frozen fruit, especially bananas, sweetens up the smoothie and gives this healthy treat a thicker creamier consistency than fresh fruit.  My husband loves this snack because it is guilt free and very filling.  This recipe is easily doubled or tripled.


Servings = 2 
WW Pts. + = 2 


Ingredients:
1/2 C. fat free Greek yogurt (I like Fage 0% or Chobani)
1 C. skim milk
1/2 C. frozen banana slices
1/2 C. frozen strawberries
1/4 C. frozen mango chunks
  
I also love to make sunrise smoothies with frozen bananas, pineapple and fresh squeezed orange juice.  Any combination of your favorite fruit will work.  

  • Put all ingredients in a blender and mix well. 
Enjoy!

Monday, March 28, 2011

Lemon Pudding Cakes with Fresh Berries

Lemon Pudding Cakes

I have been craving lemon and key lime desserts and this one definitely satisfied my need!  I was looking for another recipe and came across this Tyler Florence recipe on www.foodnetwork.com.  It was already low fat so I didn't have to change a thing except portion size.  He used four 1 cup ramekins and I used a muffin tin.  It was harder this way though because you have to invert the cakes to pop them out, so I recommend small ramekins or baking dishes and just adjust the serving size and points if you are on Weight Watchers.
   I definitely recommend serving these warm because they melt in your mouth!  

Servings : 12 regular muffin cups filled 2/3 full before baked
WW Pts. + = 2

Ingredients:
2/3 C. low fat 1 % buttermilk
1 Tbsp. unsalted butter
2/3 C. super fine sugar (if you don't have place in food processor or crush with a rolling pin)
2 large eggs, separated
2 Tbsp. fresh lemon juice, (Meyer lemons or Key Limes would be excellent!)
1 Tbsp. fresh lemon zest
1/4 C. flour
1/4 tsp. salt

Garnish:
Fresh blueberries, raspberries, blackberries and or strawberries
Powdered sugar for dusting

Directions:
  • Pre-heat oven to 325 degrees F
  • Lightly butter ramekins or small baking dishes and dust with sugar.  
  • In a mixer, add egg yolks, buttermilk, lemon juice, and lemon zest and beat until well combined.
  • Reduce speed to low and sift in flour, sugar, and salt.  Continue to mix until combined.  
  • Beat egg white until you get stiff peaks then gently fold a little at a time into the buttermilk mixture,  
  • Divide equally into desired baking dishes and bake in a water bath by placing in a roasting tray and filling it with water halfway up the sides of the dishes.
  • Bake until the top is golden brown and springs back when gently pressed.                                                                                                                                    ~Time wise this is where it gets a little tricky.  The original recipe called for 1 cup ramekins to be baked for 60 minutes but the reviews all said 40 -50 minutes.  I baked mine about 30-35 minutes but they were a lot smaller.  I recommend just watching carefully.
  • Once done remove and cool slightly.  Carefully invert onto a plate, garnish with fresh berries and dust with powdered sugar.  Serve immediately.
Lemon Pudding Cakes - you can see the top "pudding" layer


When you invert the cake it will have a slightly soft "pudding" layer on top.  The cake bottom has a sweet buttery chewiness , while middle is light and fluffy.  The warm pudding top melts in your mouth.  I hope that you love this beautifully light and lemony dessert as much as we did.   Thank you Tyler Florence! 

Enjoy!